First, let's make sure we're going to upload files in the correct format. Directly below the Local and Remote System fields you'll see three check boxes: one labeled "ASCII," one labeled "Binary" and the other "Auto." Check the box marked "Auto." This will ensure that the file types you upload are transfered in the correct format. Graphics or images should be transfered in Binary and most other files transfered in ASCII. For our purposes the "Auto" option in WS-FTP should work fine.
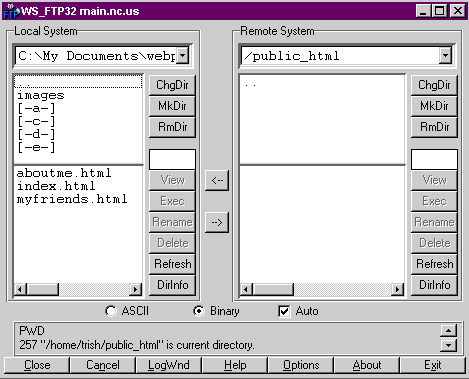
Next, we need to get into the directory on my computer, the Local System side, where the files for our webpage reside. My files are in the "My Documents" folder on my C drive, in a folder called "webpage", and you will need to use the location you've selected for those files on your system here. To get to those files I double-clicked on the "My Documents" directory in the top field. Then I double clicked on the "webpage" directory also in the top field. In the picture below you see this correct path name on the Local System side, and that I am now looking at the contents of my "webpage" folder which is in the "My Documents" folder on my C drive:

The contents of my "webpage" folder are now displayed in the fields below the file path. You can see I have a directory called "/images" and three files: index.html, aboutme.html and myfriends.html.
These are all the files I need to upload for my web page. But I need to upload them into the directory called "public_html" on the Remote side or MAIN's server. So, first I double-click on the "public_html" folder on the Remote side. Since we haven't uploaded any files to our Remote System, this directory should be empty as in the picture below:
Now, we're finally ready to upload!