 ...Steel
 |
...Steel |
*here's e-mail and
forge parts list sent by Tony Bivens
update 12/11/02, correction on location of schematic.
Ben Bradshaw sent in a link on a
neat little forge made from fire brick http://www.jamesriser.com/Machinery/GasForge/PropaneForge.html
OK, Lets try breaking this down.
Gas feed
Propane Tank
Connecter
adjustable high
pressure regulator
hose or copper
tubeing
adjusting valve or
Idler circuit... http://www.hybridburners.com/idle-full.jpg
Burner
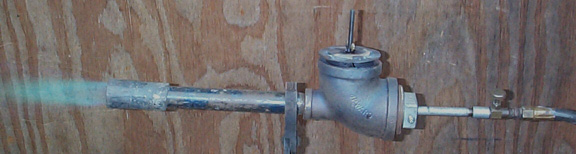
from the left
flared end...
should be stainless, fits over 3/4"pipe with 1:12 flared taper
3/4 inch pipe
9 (or so)inches long threaded on one end
2" X 2" X 3/4"
reducing tee. This must have the small opening (3/4") on one end,
2"in the middle and the other end.
Choke
2 1/4" long 1/4 rod welded accross middle opening with 1/4-20 allthread
1"to 2" long welded at 900 from
middle
2 1/4" to 3" diameter sheetmetal disk with 1/4-20 wing nut welded over
center hole
2" plug
best if solid in the square(or hex) end. 13/32 hole drilled
in center for 1/8 pipe nipple and set screw hole drilled and tapped from
side
1/8" pipe nipple,
should be schedule 80. The one shown is 6"long because I wanted to
be sure and have enough adjustment. 4" probably would have been enough.
Tapped 1/4-28 one end for
14T Tweco tip
| e-mail and an
attachment sent from Tony Bivens.
Hi Tom, Pulsating may be caused by the amount of flare, the tuning of the burner or too low gas pressure. With chokes, I am able to idle mine down to almost 0 psi. I have cut and pasted the following tuning info from Ron Reil's page, I hope this will help: Following the tuning of the jet tube you will need to tune the flared or straight sided nozzle. This is done by releasing its set screws so you can slide it in or out on the burner tube. Move it out, and as you do so find the location where you can achieve the maximum gas pressure without blowing out the flame. You will probably end up with a nozzle exposure of somewhere between 1-1/4" and 1-1/2". This establishes your high pressure end point, and you should be able to run pressures up to 30-50 psi with this nozzle setting, perhaps higher. Mark or measure its location for later use. Now slide the nozzle in, reducing its exposure, and find the position where the flame goes out while running at a minimal pressure. You may find it goes right to the end of the burner tube, but probably not. When you locate this low pressure end point, simply adjust your nozzle for a position midway between the two extreme points you have determined. My welding supplier did not have the tapered tips, so I took the regular tweco tip, chucked it in my drill press and used a file and sandpaper to taper it, I could'nt tell a big difference, but I did have to to retune the burner. The turbulance is a good idea, I first saw that mentioned on the Gurus page at anvilfire.com. A choke may help create the turbulance also. I understand that the flare is critical. I ordered stainless flares
from Larry Zoeller, $6.50 + S&H apiece and well worth it. http://www.geocities.com/zoellerforge/flare.html
Yes, I have insulation and the reducing tees for the sidearm burner. I am going to charge my cost on these, I'll calculate the insulation and let you know. I will be glad to furnish photos and a narrative of the construction and tuning. Right now I am still experimenting with it and finishing a few details. I will probably try to incorporate an ignitor for easier lighting and then decide on adding the idle curcuit. I am adding a heat shield for the plumbing, regulator and gauge so I will probably leave the plumbing where it is. The itc seems to crack when drying and firing if not put on thin. This seems to be my biggest mistake so far. I will probably try to forge weld in it this week, I'll let you know how that goes ; ). Hope that addresses most of your questions, I'll send the list later. Bye for now. Tony
1288 Fairview Rd.,
P.O. Box 250, Stockbridge, GA 30281
Forge Shell:
Stand:
Inswool or Kaowool:
ITC100:
Kiln Shelf:
Lightweight refractory kiln bricks:
Burner parts:
Reducing tee ¾ x 2 x 2. The Reil plans call for a ¾ x 1¼ x 1¼ size. If you use a tweco tip for your jet you will need to increase the intake size, due to increased performance. Note: I have found that reducing tees come in a hemispherical design and a reducing design. My research implies that the reducing design will be better, however I am using the hemispherical design with satisfactory results. 1/8 x 3 ½ inch schedule 80 black pipe. The schedule 80 pipe has a smaller inside diameter (thicker walls) that works well for tapping to fit the tweco tip. 2 standard black pipe plug. Try to find the solid plug (American made) I started with an import plug that did not have enough beef to properly drill for the set screw to lock the pipe jet. 14 or 14t (tapered) tweco tip. These are cheap at most any welding supply store. I used the .045 size; I recommend getting a .040, .045, .052 size for adjustability and experimentation. Burner flare. These can be made but I recommend the stainless premade flares from Larry Zoeller. Good price, stainless steel and predrilled with setscrews. Choke. There are many styles and choices including none at all. I think this will be helpful in establishing a reducing atmosphere (for forge welding) and for running at lower pressures. I think that the choke helps create turbulence in the intake, helping to mix the propane gas and air molecules. Plumbing Propane gas regulator that will adjust from 0- 30psi minimum. A bar-b-que or turkey fryer regulator will not work. You must use a heavier, adjustable, industrial type regulator. ¼ inch brass or copper pipe, tees, flares fittings (not compression fittings) and other various fittings. A list here gets difficult, as there are many choices and styles of plumbing that you can use. i.e.: high and low pressure gauges, multiple ball valves for separate burners, idle circuit, etc. ¼ inch WOG ball valves (Water, Oil Gas). How many depends on your configuration and options. Teflon tape or pipe sealer suitable for pressurized gas lines. Spray bottle with soap water, to check for leaks.
|
Sweetwater Clay &
Leather Canvas & Steel
182 Bear Cub Path
Hayesville, NC 28904
(828) 389-4028
sweetwater@webworkz.com
![]()